

Conversion Studio
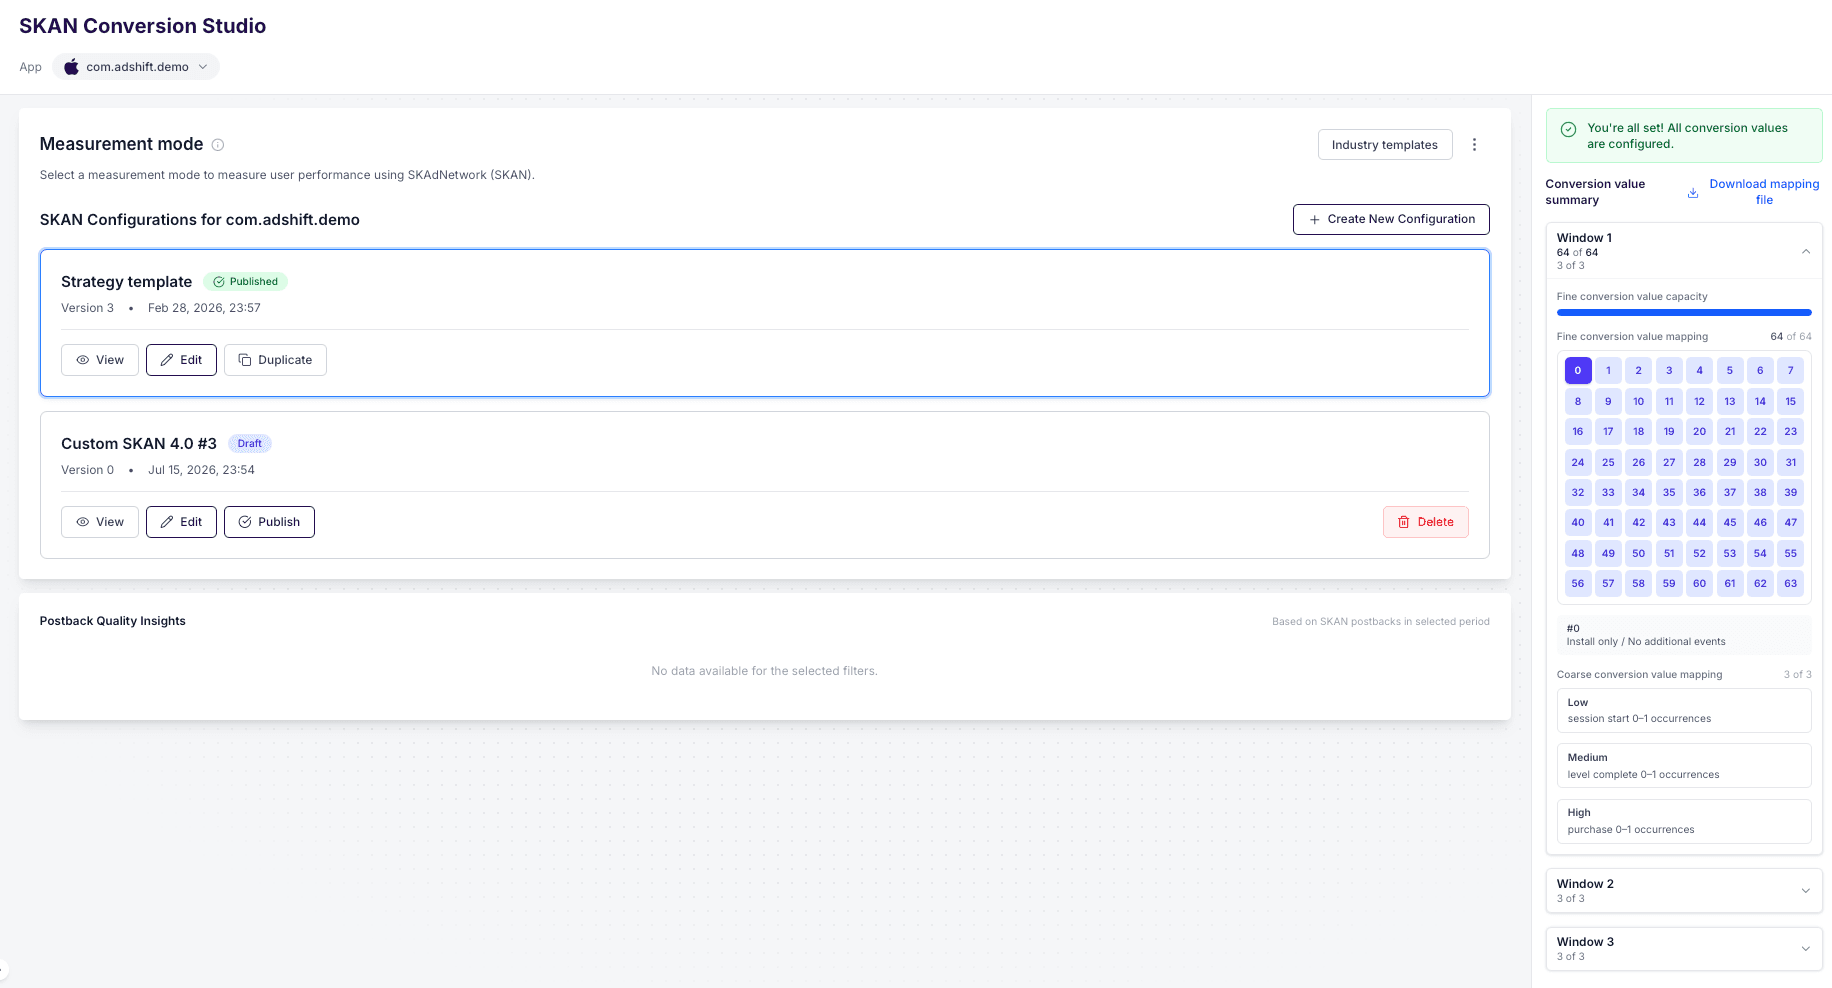
SKAN Conversion Studio lets you define what your SKAdNetwork conversion values measure — revenue, in-app events, or a funnel — without changing your app code. Configure, validate, and publish a schema for each iOS app.
On iOS, Apple's SKAdNetwork (SKAN) lets you measure paid campaigns without device-level identifiers. The catch: after each measurement window, Apple sends you a tiny number — a conversion value (CV) — and nothing else. That number means whatever you decide it means.
SKAN Conversion Studio is where you make that decision. You build a mapping from raw user activity — revenue, in-app events, a funnel — to the conversion values Apple can carry, and AdShift compiles it into a schema the SDK reads. From then on the AdShift SDK sets the right CV on every install automatically. No app code, no release.
Open it from Settings → SKAN Conversion Studio.
Conversion Studio applies to iOS apps only — the app selector shows only your iOS apps. For how SKAN attribution works and how to read the results, see SKAN: Overview.
Before you begin
- Turn on SKAN measurement with the button on the landing screen (or the SKAN measurement toggle in the ⋮ menu). SKAN is enabled per project. The first time you enable it, AdShift creates a default published configuration for every iOS app in the project, so measurement starts immediately — you don't have to build anything to get going.
- Select an iOS app. Each app has its own configuration; the selection is remembered between visits.
- Check your permissions. Creating, editing, and publishing needs the
skan.configs.managepermission. Users with onlyskan.configs.readcan open and inspect configurations but can't change or publish them.
Turning SKAN measurement off stops postbacks to your partners and pauses measurement. Turn it back on at any time.
How SKAN 4 measurement works
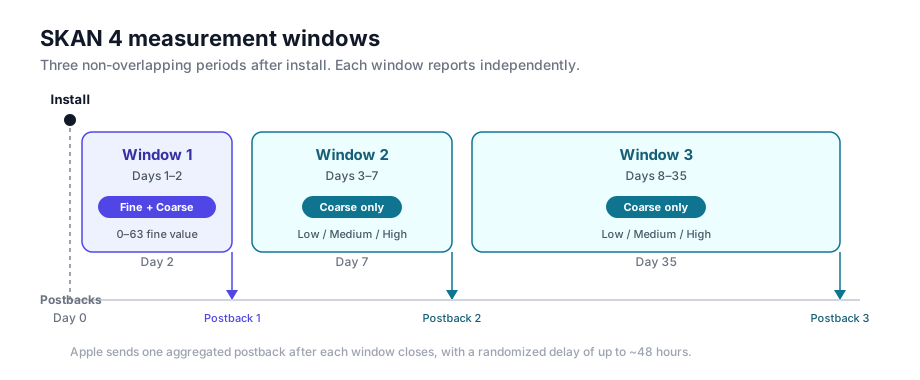
Apple splits the post-install period into three fixed, non-overlapping windows. Each window measures its own slice of time and produces its own postback — Window 2 measures days 3–7, not days 0–7.
| Window | Period | What you can measure |
|---|---|---|
| Window 1 | Days 1–2 | A fine value (0–63) and a coarse value (low / medium / high) |
| Window 2 | Days 3–7 | A coarse value only |
| Window 3 | Days 8–35 | A coarse value only |
Two ideas do all the work:
- Fine value — a precise number from 0 to 63. Only Window 1 has it, because Apple only delivers fine values when a campaign has enough installs to stay anonymous. This is where you encode detailed signals like revenue tiers or event counts.
- Coarse value — one of three buckets: low, medium, or high. Every window has one. It always arrives, even for low-volume campaigns, so it's your reliable floor of measurement.
The AdShift SDK computes these on-device from the schema you publish, and reports the highest value the user has reached in each window. It never decreases a value it has already sent.
The building blocks: measurement components
You describe what a window should measure with one or more components. A component turns a real-world signal into ranges, and AdShift packs those ranges into the conversion value for you.
| Component | Measures | Example |
|---|---|---|
| Revenue | Total revenue (all events) or revenue from one specific event, split into dollar ranges | $0–$2, $2–$4, $4–$6, … |
| In-app event | How many times an event fired, split into count ranges | as_level_achieved fired 0–1, 1–3, 3+ |
| Funnel | The furthest step a user reached in an ordered sequence of events | content_view → add_to_cart → purchase |
A few rules that keep your schema honest and match how the editor behaves:
- Revenue ranges must start at
$0and be continuous with no gaps (each range's "to" is the next range's "from"). Revenue is measured in USD; other currencies are converted automatically. Revenue includes in-app purchases, subscriptions, and ad revenue reported through the SDK, so a revenue component can drive the conversion value for ad-monetized apps too. - In-app event ranges must be whole numbers, continuous, and start at
0. - Funnel components live in the fine value only and need at least 2 steps with unique event names.
- The Reported value shown next to each range (e.g. "$2.5") is the midpoint AdShift will report back for that bucket — it's for your reference, you don't set it.
Fine value capacity
The fine value is only 6 bits, so a single Window 1 postback can carry at most 64 distinct codes (0–63). Every combination of your components has to fit inside those 64 codes.
The math is a product, not a sum. Each component needs (number of ranges) + 1 states — the extra state is the baseline "nothing happened yet". So:
codes needed = (revenue ranges + 1) × (event ranges + 1) × (funnel steps + 1) × …
For example, a revenue component with 7 ranges (8 states) combined with an event component with 3 ranges (4 states) needs 8 × 4 = 32 codes.
The editor shows a live capacity bar as you build. If you go over 64, the configuration is marked over capacity and can't be published — reduce the number of ranges, drop a component, or push some of that detail into the coarse value (which is separate and doesn't count against the fine capacity).
Single Source of Truth (SSOT)
Window 1's fine value can reserve one bit for Single Source of Truth. When enabled, this bit records whether the same install was also attributed device-level by the AdShift SDK. That's what lets the SKAN Overview dashboard de-duplicate SKAN installs against SDK-attributed installs, so you don't double-count.
The trade-off: reserving that bit halves the space your components can use — you get 32 combinations for measurement instead of 64. The capacity bar accounts for this automatically.
SSOT is on by default and recommended. It's what unifies SKAN with the rest of your attribution into one record per user. It only affects reporting, not what the SDK measures.
Coarse value: low, medium, high
For the coarse value you decide what qualifies a user for low, medium, or high in each window. A level can combine several conditions (all must be true — AND logic), with at most one revenue condition per level.
- Low is your baseline. In Window 1, Low is locked to the built-in
session_startbaseline and can't be edited — it guarantees that even a barely-active install still reports a value. In Windows 2 and 3, we strongly recommend keepingsession_startin Low for the same reason. - Medium and High are where you place the signals that matter — a key event, a revenue threshold, a purchase.
- The SDK evaluates High first, then Medium, then Low, and reports the first level that matches — so a high-value user lands in High.
Lock window (optional)
By default a window stays open for its full duration and the postback is sent when the window closes. Lock window lets you finalize Window 1 early and have Apple send the postback sooner — useful when you can already tell a user is high-value and don't need to wait.
You can lock by:
- High coarse value — lock as soon as the user reaches the High coarse bucket. Postbacks then arrive up to ~96 hours (4 days) post-install.
- Time — lock a set number of hours post-install (up to 48 hours for Window 1).
A time-based lock only takes effect the next time the user opens the app — the SDK can't act while the app is closed. Locking early can also reduce the precision of Apple's install-time estimates, so use it deliberately.
Start from an industry template
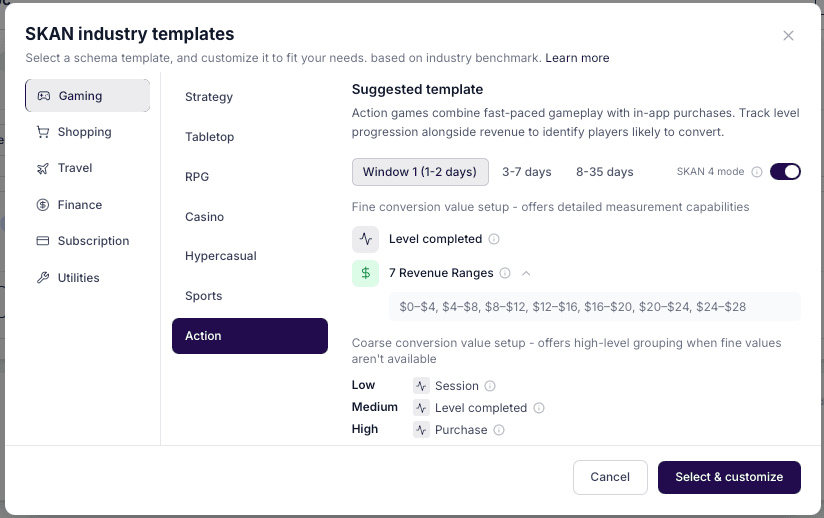
Building a schema from a blank page is hard. Industry templates give you a professionally designed starting point for common verticals — pick one, preview the window setup, and apply it as a new draft you can customize.
| Vertical | Strategies |
|---|---|
| Gaming | Strategy, RPG, Casino, Hypercasual, Sports, Action, Tabletop |
| Shopping | Revenue focused, Revenue and events focused |
| Travel | Booking focused, Search and engagement focused |
| Finance | Transaction focused, Account activation focused |
| Subscription | Trial to paid, Content engagement |
| Utilities | Feature adoption, Session focused |
Open Industry templates from the top of the page, choose a vertical and strategy, review the fine/coarse breakdown per window, and apply it. It becomes a draft — nothing goes live until you publish.
Build and preview a configuration
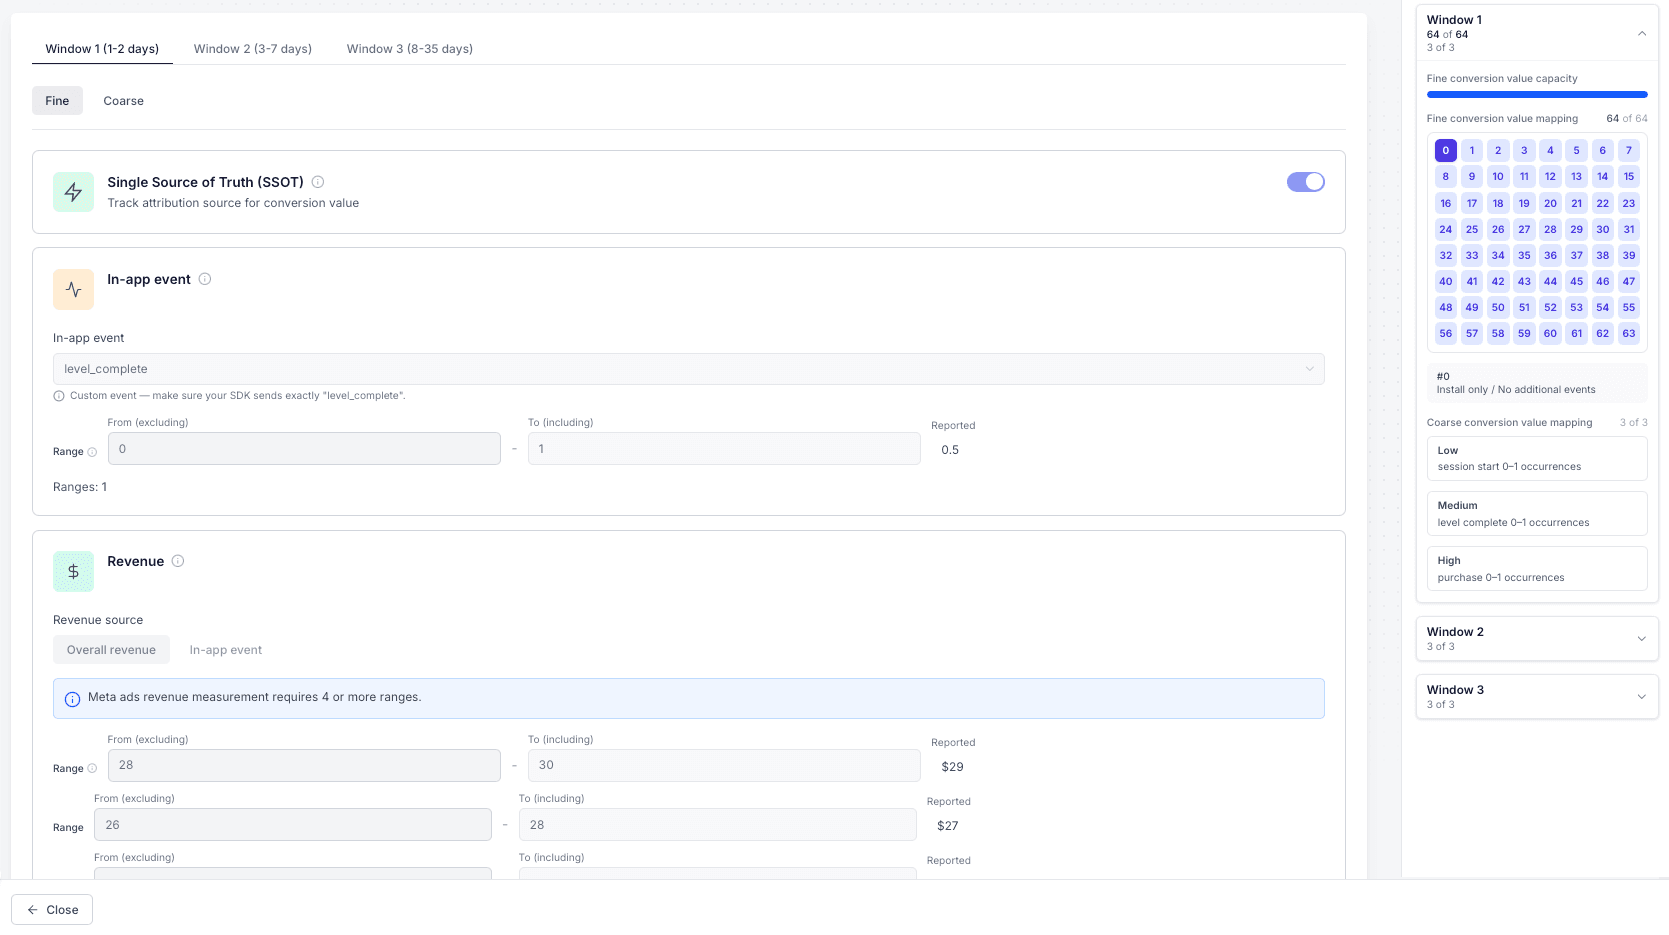
Inside a draft, the editor is organized by window and granularity:
- Window tabs — Window 1, Window 2, Window 3. Windows 2 and 3 only offer the Coarse tab, because they have no fine value.
- Fine / Coarse tabs — switch between editing the fine value (Window 1 only) and the coarse buckets.
- Add measurement — add Revenue, In-app event, or Funnel components to the fine value; add Revenue or In-app event conditions to each coarse level.
As you edit, the Conversion value summary panel on the right updates live:
- A capacity bar for the Window 1 fine value (used vs 64), turning red if you exceed it.
- A grid of every fine code (0–63) — click a cell to see exactly which combination of revenue/events/funnel/SSOT it represents.
- The coarse mapping for each window, showing what lands in Low, Medium, and High.
- An overall status: all set, needs attention, or over capacity.
This is your safety net — you can see precisely what each conversion value will mean before anything reaches a user.
Publish: draft → published → archived
Every configuration moves through three states:
- Draft — a work in progress you can edit freely. You can keep up to 5 drafts per app.
- Published — compiled, signed, and live to the SDK. There is exactly one published configuration per app at a time.
- Archived — a previously published configuration, kept for history.
You never edit a live configuration in place. Choosing Edit or Duplicate on a published config creates a new draft, so the version your users are on is never disturbed while you work.
How to publish
- Open or create a draft and configure your windows.
- Click Publish. AdShift first validates the draft. Publishing is blocked until every check passes:
- Revenue ranges start at
0and are continuous with no gaps. - Event ranges are whole numbers and continuous.
- Each funnel has at least 2 steps with unique event names.
- Window 1's Low coarse level includes the
session_startbaseline. - Total fine combinations fit within capacity (≤ 64, or ≤ 32 with SSOT).
- Any lock-window time is within the window (≤ 48h for Window 1).
- Revenue ranges start at
- If validation passes, AdShift compiles the draft into a compact, signed SDK payload and pushes it live. Publishing this configuration will:
- Make it the active configuration.
- Archive the current published version (its version number increments automatically).
- Send the update to connected partners.
If validation fails, the editor lists each problem so you can fix it and try again.
Good to know
- When changes take effect. A published schema is downloaded by the SDK on a device's first launch and used for that install's whole 35-day cycle. So a new publish applies to installs going forward — devices already measuring keep the schema they downloaded. Plan schema changes ahead of a campaign, not in the middle of one.
- Wait about a month between changes. For consistent, comparable data we recommend leaving a published schema in place for roughly a month before publishing a new one. Conversion Studio shows a reminder with a suggested next date.
- Use canonical event names. The SDK counts events by their exact name. Built-in events use the
as_prefix (for exampleas_purchase,as_add_to_cart,as_level_achieved,as_ad_revenue). If you type a bare name likepurchase, it will not matchas_purchaseand the rule will never fire — the event picker warns you and suggests the canonical name. For your own custom events, use the exact name your app sends to the SDK. session_startis a baseline, not a tracked event. It represents "installed, no qualifying activity yet" and is used as the Low coarse floor. You don't need to send it from your app.- Requirements. SKAN 4 measurement needs iOS 16.1 or later on the device; older versions fall back to what their OS supports.
See also
- SKAN: Overview — how SKAN attribution works and how to read the SKAN dashboard
- Analyze: Overview — unified attribution, including the Single Source of Truth view
- Apple Search Ads — connect Apple Ads for iOS campaign costs and SKAN installs